one tuna tin
Calico measuring 7 inches square
soft toy or cushion stuffing
two medium sized buttons
strong thread ( I used quilters thread)
perle thread
sewing kit
shabby chic braid measuring approximately 12 inches
pva glue
felt measuring 3 3/4 inches
chalk pencil or other marking pencil
1/ wash your tuna can and make sure that any sharp edges are bent inwards.
2/ Draw and cut out a paper template of a circle with a diameter of 6 1/2 inches. Pin the template to some calico or other decorative fabric and using it as a guide, cut a fabric circle out the same size.
3/ Make a ball of some toy or cushion stuffing.
With some strong cotton ( I used quilting cotton) thread a needle and bringing both ends of the thread together, tie them in a knot. The thread should now be double. Sew a running stitch around the edge of the circle about a 1/4 inch in from the edge.
4/ When you complete the circle loop the two threads together and pull on both to bring in the sides of the circle. Place the stuffing into the center of the circle so that once the edges are pulled tight the ball should be nice and firm. Tie a double knot with the thread to hold everything in place.
5/ Thread a needle with some perle cotton and make a few anchoring stitches near the hole on the bottom of the ball. Place one of the buttons over the hole and sew up and down through the holes to keep it in place. Then take the thread through the center of the ball and up out on to the center front.
Keeping the cotton quite loose at this stage wrap it around the side of the ball and through one of the button holes on the ball bottom and up though the centre of the ball again. Repeat this proceedure 6 times leaving the cotton in a different area around the sides of the ball, so that it is divided into equal segments.
6/ Once the ball has been wrapped 6 times adjust the cotton until you are happy with spacing and then pull on the threads one at a time making them tighter and pulling in the sides of the ball.

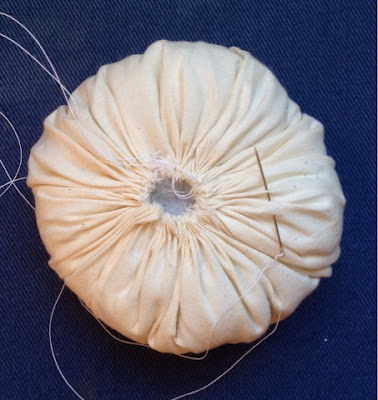
The back of the ball.
7/ Once everything has been tightened, take the thread up through the ball again and through the second button so that it is placed in the centre of the top of the ball. Bring the thread down though the button and through the button at the bottom of the ball and again up through the top button so that it is secure. Tie the thread off by looping it around some of the strands over the bottom button.
8/ Push the fabric ball into the tuna can. It should be firm and stay in place. Some pva may be added in the can before hand if you wish.
9/ Trim your shabby chic braid so that the ends overlap each other by about 1/2 inch. Add some pva glue on the underside of the braid and place it around the sides of the can. Hold it in place a a couple of minutes until the glue starts to set.
10/ Place the tin onto some felt and with a chalk pencil or water soluble pencil trace around the bottom edge. Cut out the felt circle just inside the drawn line and with some extra pva stick it underneath the can.
The finshed pin cushion.


No comments:
Post a Comment