Showing posts with label TUTORIALS. Show all posts

Friday, 25 December 2015

TextileArt07 Christmas Decoration 2015

Happy Christmas!

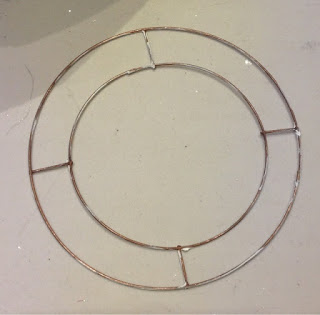
The Christmas challenge set by the TextArt07 group this year was to do something with a small double metal hoop.  It did not have to have a Christmas theme but I was very short of time and thought it could be my Christmas decoration tutorial.

Then I came down with a dreadful chest infection and although I had finished the wreath, missed the party and did not have time to do the tutorial. I did take a few photos and so decided here on Christmas morning to show you how I made it.

 This is rare I might add as I usually host Christmas Dinner for lots of people but with all the building work going on we were invited to family. This means I am calm and relaxed instead of running around in a flap.

I painted the hoop with some white paint to soften the colour.  I then made lots of small sandwiches of angelina fibre, silver fabric and lace, and organza, covered with a layer of chiffon and placed it in a large sewing hoop.


I then free machine stitched some five petalled flowers with silver thread.

I cut each one out with a border.
I then took some silver wire and knotted on some crystal beads leaving gaps.  I wrapped the wire in the gaps along a pencil to make them curly. 
I made a circle of angelina fibre and laid it at the back of the hoop.  I stitched the flowers on the front of the hoop, through  onto the angelina at the back, and added a crystal bead in each centre.  I then carefully wound the wire around and around the hoop.  I touched the wire up with a little white paint to highlight it in places.

Being very short of time this year I decided to place the wreath on the top of my Christmas cake.


Hanging on a cupboard door.

Have a very Happy Christmas and New Year.

Tuesday, 6 January 2015

Shabby Chic Braid Pincushion Tutorial

Materials

one tuna tin
Calico measuring  7 inches square
soft toy or cushion stuffing
two medium sized buttons
strong thread ( I used quilters thread)
perle thread
sewing kit
shabby chic braid measuring approximately 12 inches
pva glue
felt measuring 3 3/4 inches
chalk pencil or other marking pencil


1/   wash your tuna can and make sure that any sharp edges are bent inwards.
2/   Draw and cut out a paper template of a circle  with a diameter of 6 1/2 inches.  Pin the template to some calico or other decorative fabric and using it as a guide, cut a fabric circle out the same size.


3/   Make a ball of some toy or cushion stuffing.


With some strong cotton ( I used quilting cotton)  thread a needle and bringing both ends of the thread together, tie them in a knot.  The thread should now be double.  Sew a running stitch around the edge of the circle about a 1/4 inch in from the edge.


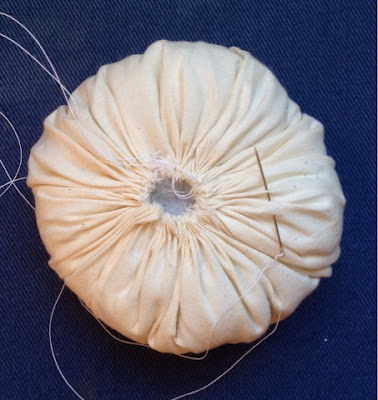
4/   When you complete the circle loop the two threads together and pull on both to bring  in the sides of the circle.  Place the stuffing into the center of the circle so that once the edges are pulled tight the  ball should be nice and firm.  Tie a double knot with the thread to hold everything in place.


5/   Thread a needle with some perle cotton and make a few anchoring stitches near the hole on the bottom of the ball. Place one of the buttons over the hole and sew up and down through the holes to keep it in place. Then take the thread through the center of the ball and up out  on to the center front.

 Keeping the cotton quite loose at this stage wrap it around the side of the ball and through one of the button holes on the ball bottom and up though the centre of the ball again.  Repeat this proceedure 6 times leaving the cotton in a different area around the sides of the ball, so that it is divided  into equal segments.


6/   Once the ball has been wrapped 6 times adjust the cotton until you are happy with spacing and then pull on the threads one at a time making them tighter and pulling in the sides of the ball.


   The back of the ball.


7/   Once everything has been tightened, take the thread up through the ball again and through the second button so that it is placed in the centre of the top of the ball.  Bring the thread down though the button and through the button at the bottom of the ball and again up through the top button so that it is secure.  Tie the thread off by looping it around some of the strands over the bottom button.


8/   Push the fabric ball into the tuna can.  It should be firm and stay in place.  Some pva may be added in the can before hand if you wish.
9/   Trim your shabby chic braid so that the ends overlap each other by about 1/2 inch.  Add some pva glue on the underside of the braid and place it around the sides of the can.  Hold it in place a a couple of minutes until the glue starts to set.
10/   Place the tin onto some felt and with a chalk pencil or water soluble pencil trace around the bottom edge.  Cut out the felt circle just inside the drawn line and with some extra pva stick it underneath the can.
The finshed pin cushion.

Thursday, 4 December 2014

Christmas Decoration - part one - Tutorial

The Textart07 group challenge this year for our Christmas party exchange is a Christmas tree decoration.  This is my creation and how I made it.

 Note - You need to know how to free machine stitch to make this project.
You need to be able to drop the feed dogs of your sewing machine so that it can move inependently and have a free machine or darning foot.
Materials

pelmet vilene measuring 12 inches by 4 inches
2 pieces of bondaweb each measuring 12 inches by 4 inches
2 pieces of gold or silver fabric each measuring 12 inches by 4 inches
freezer paper or ordinary paper measuring 12 inches by 4 inches
gold or/and silver beads and sequins
I large bead or crystal to hang in the centre
gold or silver thin braid or cord for hanging
water soluble material ( I used Julliette)
 machine silver or gold thread
sewing kit
iron and ironing board
silicon paper or baking parchment to protect the decoration and your ironing board and iron
sewing machine


1/   Using the silicon or parchment paper to protect your ironing board, place one piece of the bondaweb paper to one side of the pelmet vilene with the paper side upwards.  Lay over some more parchment paper to protect your iron and without using steam, iron it on. When the vilene is cool, peel off the paper and lay the silver or gold fabric on top of it, right side upwards.  Again covering it with parchment paper iron the fabric to the vilene.  Repeat this process on the other side of the vilene so that it has been covered both sides with fabric.


2/   Out of the freezer or normal paper draw and cut out three rings with the inner hole being 1 3/8  inches in diameter and the outer ring measuring  3 6/8  inches in diameter.  If you are using freezer paper lightly iron them into one side of the vilene otherwise you can pin the rings in place.

Cut each ring out.

3/   Fold the water soluble material over trapping the the rings inside.  Pin the water soluble to hold it in place and then you can cut the rings apart for easier sewing.


4/   Thread up your sewing machine and prepare it for free machine stitching by dropping the feed dogs, changing the foot to a darning one and altering the tensions.  If you have never done this before you will need a short lesson on machine embroidery.

Starting in the centre, I sewed on and off of the edge of the ring making little tails out onto the water soluble material, and moving around the ring.  After I had finished the centre I sewed a wiggly line across the ring to the outer edge and repeated the process again. After that I sewed a running stitch on the water soluble material linking all of the tails to give them a little more support.

To finish the rings I stitched around them from the inner to the outside edges in wavy over lapping lines until the whole piece was sown together and decorated.


 5/   Carefully cut away any excess water soluble material.

6/   Soak in some warm water, agitating it every so often to help dislodge the water soluble film.  Run under a warm tap to make sure all the film has gone.


7/   Leave somewhere flat to dry.

 -Continued in Christmas Decoration -  part two - tutorial.

Christmas Decoration 2014 - part two - Tutorial

-Contination of the Christmas Decoration 2014.
8/  Sew as many beads and sequins as you like on one side of each ring.  You may wish to decorate both sides and that is fine but it just takes longer.


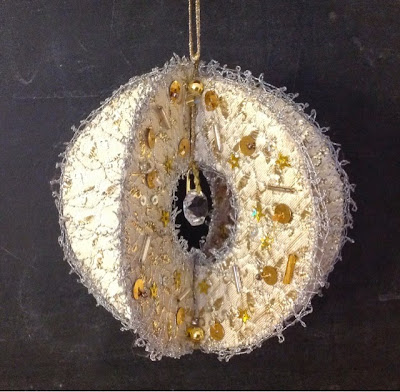
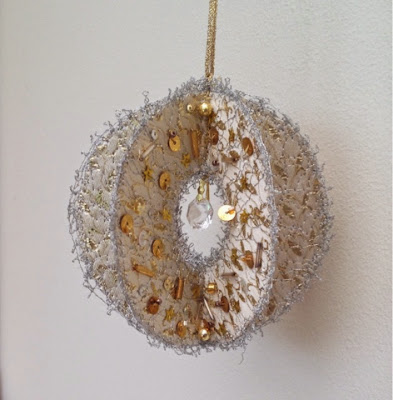
9/ Fold the rings in half to make a crease line at the top and bottom of each ring.  Lay all of the rings on top of each one, lining up the creases and with some double thread or on the sewing meachine sew them together, through all layers on the crease line .Cut off a length of gold or silver cord and loop it around the decoration refering to the photograph.  On the outer edge tie a knot with the cord to keep it in place.


10/   With some double thread sew a bead between each part of the decoration at the bottom moving around in a circle and sewing around again through all of the beads to provide extra strength to the decoration.  Repeat this at the  top of the decoration.  This helps to keep the decoration in shape.

11/   Sew a large bead or crystal in the hole of the decoration centre to add a little more interest.

You may need to press the decoration under a book overnight to help create its 3 D shape.


The same method could be used for other shapes.