Wednesday, 26 November 2014

Textart07 Textile Group

I  belong to a textile group called Textart07 which was formed  in 2007 by a group of sewers who had attended a City and Guild Machine Embroidery course with Sandra Hardy.  Over the years some people have moved away and new people have joined us and we now have a membership of 13 people.  We keep  to a low number so that we have enough table space when we meet up, which is every other Tuesday from 9.30 to 4.00 pm at Chievely Village  Hall in Berkshire. 

 During most meetings we work on our own projects, but we sometimes also set ourselves challenges and  hold mini workshop, taught mainly by other members of the group.  Two years ago we held our first exhibition and we are currently planning another one for next September.

One of our little challenges one Christmas was a pin cushion which we swapped with each other. The one I made was this mouse.


Another challenge we ran consisted of each member contributing some fabric or other sewable material, which were then devided into equal packs.  We were presented with a pack and also a small canvas frame on which our piece had to be mounted in some way.  This was my piece of work and my pack of materials. I often use both machine and hand embroidery in my work.


When we held our exhibition two years ago we all made a piece of work as part of a central exhibit with the title of "Shades of....". My subject was "Shades of Time" and was inspired by my younger sisters wedding.

Sunday, 23 November 2014

Cardamom, Rose and Rhubarb Cake

I particularly love the taste of cardamom and could not resist making the Cardamon, Rose and Rhubarb Cake by Vanessa Kimbell, from "The Clandestine Cake Club" cookery book, though without the icing and in three layers.  My cake did not look as lovely as the one in the book below but it was extremely yummy.  I also used my  homemade Bluebarb Jam (rhubarb and blueberry) which worked well.  I will share that favourite recipe another time.


The jam had nice chunks of rhubarb in which made the centre quite uneven which I liked.  I finished off my cake with icing sugar and dried raspberry bits.


Recipe

Cardamon, Rose and Rhubarb Cake by Vanessa Kimbell

Serves 8

250g softened butter or soft margerine
250g caster sugar plus 1tsp of ground cardamom
4    large eggs
250g self-raising flour

Rose Filling

300ml double cream
3 drops of rose essence
50g icing sugar, sifted
200g rhubarb jam

Glace Icing

150g icing sugar
warm water to mix

1/     Preheat the oven to 190c/fan  170c/gas mark 5.  Grease and line two, 20cm round sandwich tins.       (I used 3).

2/     Beat the butter and sugar using a wooden spoon or electric mixer until light and fluffy.  Add the eggs one at a time, beating well after each addition, and adding a tbsp of the flour with the final egg to prevent  it curdling.  Sift in the remaining flour and fold it in with a large metal spoon until combined.

3/     Divide the mixture between the cake tins, spreading it evenly.  Bake in the oven for 20- 25 minutes, until firm to the touch.( It needed slightly less time with 2 tins).  Turn the sponges out onto a wire rack to cool completely.

4/     When the cakes are cool, make the filling.  Whip the cream with the rose essence and the icing sugar until thick.  Spread the jam over the base of one of the sponges, (I did 2) then cover with the whipped cream and place the remaining sponge on top.

5/      Make the glace icing by sifting the icing sugar into a bowl and then gradually adding 1 to 1 1/2 tbsps of warm water until you have a runny mixture.  Pour the icing over the cake and leave to set.

High in happiness calories!

Friday, 21 November 2014

Cook Books and Cooking

When I named this blog I felt that I had to include some foody bits as the subject is never far from my thoughts and when I am involved in any textile endevors there is usually some sort of cake calling to me.

I do have a weakness for cakes and pour over my many cookery books, though tend to cook straightforward recipes most of the time.  All of my books have little slips of paper sticking out with all the recipes I am going to make someday, and I love to experiment. I tend to cook with lots of herbs and spices and love a good curry, especially when my sister Sonia cooks her South African lamb one. (Hint hint!). 

When I am feeling in the need of comfort, its to my cake books I go, and one of my favourites is "The Clandestine Cake Club"  by Lynn Hill.  The photographs are wonderful and so are all of the cakes I have made from this book.  The Clandestine Cake club are groups of people all over the country who make cakes to taste and share but don't know where they are going to meet until the last minute.  This club sounds like my idea of heaven, but my hips and thighs could not take the strain unfortunately!

I made the Cardamon, Rose and Rhubarb cake recently and will share the recipe in the next blog.


  As you can see I have quite a few cookery books. I am afraid this is not the lot as I have a few more dotted round the house as well, just in case I need sudden  inspiration.  It is easy to forget good recipes and  finding one again in a book is like hidden treasure. I nearly always write in my books, so I know when I liked something, or what went wrong.


Friday, 14 November 2014

Tutorial - Shabby Chic Braid

This shabby chic braid is easy to make and can be used for many projects, a few of which I am going to show you in later tutorials.  The braid can be made to look totally different depending on what materials are used and the widths of those materials. Although it looks quite messy it can be trimmed and neatened, though I usually wait until I am using it as it will continue to fray until sown down.

Please note that I am going to use inches and not centimetres in this tutorial as I use a quilters rotary cutter and ruler to cut my pieces and they measure  in inches. The finished width of this braid is 1 3/4 inches.


The braid may be made with more than three layers though keep in mind how you are going to decorate the centre.   In this case I am going to add an automatic machine stitch and I need at least  a 3/4 inch strip to accommodate it, as well as a zig zag stitch both sides holding it down.

In my example my widest strip is 1 3/4 inches wide.  The middle strip measures 1 1/4 inches wide and the centre strip measures  3/4 inches wide.

The length measurement depends on the project you have in mind or your fabric limitations.

Using the fabrics face upwards, lay the middle width  fabric over the widest one and stitch it down along both of its edges.  I have used a zig zag stitch but a running stitch or other decorative stitch could be used. A hand stitch could also be used such as a running or blanket stitch.


 The two pieces sown together.


Lay the centre strip down face upwards on top of the  braid and sew it down as before.


 I have added an automatic stitch pattern down the centre of my braid to finish it off but you could add many other things such as hand stitching, lace, beads or buttons.

 The finished braid.


A braid without additional decoration and one with added lace which was attached with a running stitch.


Thursday, 13 November 2014

Autumn Shoe Box Challenge

I have quilt which I hang in my hall every Autumn which was made many years ago by some friends and I on a shoebox challenge.  We all picked a theme and in a shoebox or similar box  put equivalent of 12 inches worth of patchwork which we had made.  We also put in a few pictures, some bits of fabric and a few words describing the type of things we liked or wanted.

We passed the boxes on and the next person would also add another 12 inches of worth of patchwork. There were six of us ( Sonia Clifton, Jenny Manning, Keron Burgess, Susan Tomlinson, Jax Narnor and myself ) and after six months we held a pot luck party and opened all of the boxes.  Each of us would have seen the boxes at various stages but of course we hadn't seen our own box for 5 months.

It was great fun and very exciting when we opened our boxes and we spent a lot of  time arranging all the pieces.  We then took away our pieces and made them into our quilts, adding extra pieces as required.  My theme was Autumn and I particularly love this quilt as it was partly made by some of my very best friends, some of who do not live near me any more.


I could not stand back far enough for a front photograph, sorry about that!


My two cats used the quilt as a climbing frame when they were little and so my scarcrows mouth looks a little skew whiff.


Monday, 10 November 2014

Hand Made Books

One of the items which I designed last year and hope to make more of in the future is decorated notebooks or journals.  The covers are made with fabrics, paper and other materials such as lace, with added embroidery.  The pages are made of different types and weights of paper some of which have stamps, paint and other various marks on them. The papers have torn edges giving the books a shabby chic look.

There is a light theme for each book which could be taken as just decoration or used as a starting point and added to.

Even when using the same theme, each book is totally unique as I use what ever I have to hand and often what I have been working on.  The allium book used as an example is for sale in my Folksy shop and results from a body of work on that theme.  There are more Allium pieces to see in the gallery section, on my website at www. mariannemohandes.com.


Monday, 3 November 2014

Teeny Tiny Rabbits

Now we are in November I am starting to think about the approach of Christmas, as the weeks just seem to fly by as it approaches.  Most years I manage to make something for at least one member of my family but I think this year is going to be an exception as life has been very stressful to say the least.  I am instead going to share an extra little gift which I made for some of my family last year.

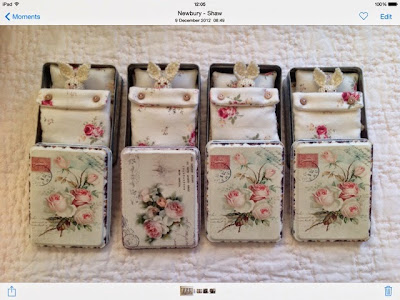
 I downloaded a sweet free pattern from Litttle Cotton Rabbits website                                                 ( littlecottonrabbits.typepad.co.uk )  for a teeny tiny knitted rabbit.  I decided I would make 4 of these for my nieces as an extra little special gift.   They needed something to protect and keep them and so I bought some small metal boxes and made some bedding to fit them.

The pattern knitted up beautifully but it was quite challenging to sew all of the tiny bits together.  I was very pleased with the results and so were my nieces.  Thank you Julie Williams for creating such a cute pattern and sharing it with everyone.